Monday, September 24, 2007

10 things you can do when Windows XP won't boot

When your computer hardware appears to power up okay, but the Windows XP operating system won't boot properly, you have to begin a troubleshooting expedition that includes getting into the operating system, determining the problem, and then fixing it. To help you get started on this expedition, here are 10 things you can do when Windows XP won't boot.

#1: Use a Windows startup disk

One of the first things you should reach for when troubleshooting a Windows XP boot problem is a Windows startup disk. This floppy disk can come in handy if the problem is being caused when either the startup record for the active partition or the files that the operating system uses to start Windows have become corrupted.

To create a Windows startup disk, insert a floppy disk into the drive of a similarly configured, working Windows XP system, launch My Computer, right-click the floppy disk icon, and select the Format command from the context menu. When you see the Format dialog box, leave all the default settings as they are and click the Start button. Once the format operation is complete, close the Format dialog box to return to My Computer, double-click the drive C icon to access the root directory, and copy the following three files to the floppy disk:

* Boot.ini
* NTLDR
* Ntdetect.com

After you create the Windows startup disk, insert it into the floppy drive on the afflicted system and press [Ctrl][Alt][Delete] to reboot the computer. When you boot from the Windows startup disk, the computer will bypass the active partition and boot files on the hard disk and attempt to start Windows XP normally.

#2: Use Last Known Good Configuration

You can also try to boot the operating system with the Last Known Good Configuration feature. This feature will allow you to undo any changes that caused problems in the CurrentControlSet registry key, which defines hardware and driver settings. The Last Known Good Configuration feature replaces the contents of the CurrentControlSet registry key with a backup copy that was last used to successfully start up the operating system.

To use the Last Known Good Configuration feature, first restart the computer by pressing [Ctrl][Alt][Delete]. When you see the message Please select the operating system to start or hear the single beep, press [F8] to display the Windows Advanced Options menu. Select the Last Known Good Configuration item from the menu and press [Enter].

Keep in mind that you get only one shot with the Last Known Good Configuration feature. In other words, if it fails to revive your Windows XP on the first attempt, the backup copy is also corrupt.

#3: Use System Restore

Another tool that might be helpful when Windows XP won't boot is System Restore. System Restore runs in the background as a service and continually monitors system-critical components for changes. When it detects an impending change, System Restore immediately makes backup copies, called restore points, of these critical components before the change occurs. In addition, System Restore is configured by default to create restore points every 24 hours.

To use System Restore, first restart the computer by pressing [Ctrl][Alt][Delete]. When you see the message Please select the operating system to start or hear the single beep, press [F8] to display the Windows Advanced Options menu. Now, select the Safe Mode item from the menu and press [Enter].

Once Windows XP boots into Safe mode, click the Start button, access the All Programs | Accessories | System Tools menu, and select System Restore. Because you're running in Safe mode, the only option on the opening screen of the System Restore wizard is Restore My Computer To An Earlier Time, and it's selected by default, so just click Next. Then, follow along with the wizard to select a restore point and begin the restoration procedure.

#4: Use Recovery Console


When a Windows XP boot problem is severe, you'll need to use a more drastic approach. The Windows XP CD is bootable and will provide you with access to a tool called Recovery Console.

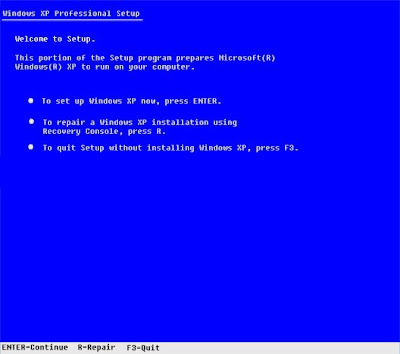
To boot from the Windows XP CD, insert it into the CD-ROM drive on the problem system and press [Ctrl][Alt][Delete] to reboot the computer. Once the system begins booting from the CD, simply follow the prompts that will allow the loading of the basic files needed to run Setup. When you see the Welcome To Setup screen, shown in Figure A, press R to start the Recovery Console.

Figure A
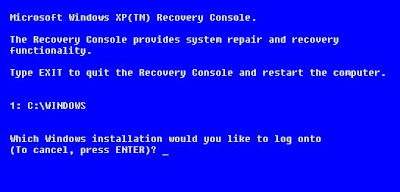
You'll then see a Recovery Console menu, like the one shown in Figure B. It displays the folder containing the operating system's files and prompts you to choose the operating system you want to log on to. Just press the menu number on the keyboard, and you'll be prompted to enter the Administrator's password. You'll then find yourself at the main Recovery Console prompt.

Figure B


#5: Fix a corrupt Boot.ini

As the Windows XP operating system begins to load, the Ntldr program refers to the Boot.ini file to determine where the operating system files reside and which options to enable as the operating system continues to load. So if there's a problem rooted in the Boot.ini file, it can render Windows XP incapable of booting correctly.

If you suspect that Windows XP won't boot because Boot.ini has been corrupted, you can use the special Recovery Console version of the Bootcfg tool to fix it. Of course, you must first boot the system with the Windows XP CD and access the Recovery Console as described in #4.

To use the Bootcfg tool, from the Recovery Console command prompt, type

Bootcfg /parameter

Where /parameter is one of these required parameters:

* /Add--Scans the disk for all Windows installations and allows you to add any new ones to the Boot.ini file.
* /Scan--Scans the disk for all Windows installations.
* /List--Lists each entry in the Boot.ini file.
* /Default--Sets the default operating system as the main boot entry.
* /Rebuild--Completely re-creates the Boot.ini file. The user must confirm each step.
* /Redirect--Allows the boot operation to be redirected to a specific port when using the Headless Administration feature. The Redirect parameter takes two parameters of its own, [Port Baudrate ] | [UseBiosSettings].
* /Disableredirect--Disables the redirection.

#6: Fix a corrupt partition boot sector

The partition boot sector is a small section of the hard disk partition that contains information about the operating system's file system (NTFS or FAT32), as well as a very small machine language program that is crucial in assisting the operating system as it loads.

If you suspect that Windows XP won't boot because the partition boot sector has been corrupted, you can use a special Recovery Console tool called Fixboot to fix it. Start by booting the system with the Windows XP CD and accessing the Recovery Console as described in #4.

To use the Fixboot tool, from the Recovery Console command prompt, type

Fixboot [drive]:

Where [drive] is the letter of the drive to which you want to write a new partition boot sector.

#7: Fix a corrupt master boot record

The master boot record occupies the first sector on the hard disk and is responsible for initiating the Windows boot procedure. The master boot record contains the partition table for the disk as well as a small program called the master boot code, which is responsible for locating the active, or bootable, partition, in the partition table. Once this occurs, the partition boot sector takes over and begins loading Windows. If the master boot record is corrupt, the partition boot sector can't do its job and Windows won't boot.

If you suspect Windows XP won't boot because the master boot record has been corrupted, you can use the Recovery Console tool Fixmbr to fix it. First, boot the system with the Windows XP CD and access the Recovery Console as described in #4.

To use the Fixmbr tool, from the Recovery Console command prompt, type

Fixmbr [device_name]

Where [device_name] is the device pathname of the drive to which you want to write a new master boot record. For example, the device pathname format for a standard bootable drive C configuration would look like this:

\Device\HardDisk0

#8: Disable automatic restart

When Windows XP encounters a fatal error, the default setting for handling such an error is to automatically reboot the system. If the error occurs while Windows XP is booting, the operating system will become stuck in a reboot cycle--rebooting over and over instead of starting up normally. In that case, you'll need to disable the option for automatically restarting on system failure.

When Windows XP begins to boot up and you see the message Please select the operating system to start or hear the single beep, press [F8] to display the Windows Advanced Options Menu. Then, select the Disable The Automatic Restart On System Failure item and press [Enter]. Now, Windows XP will hang up when it encounters the error and with any luck, it will display a stop message you can use to diagnose the problem.

#9: Restore from a backup

If you can't seem to repair a Windows XP system that won't boot and you have a recent backup, you can restore the system from the backup media. The method you use to restore the system will depend on what backup utility you used, so you'll need to follow the utility's instructions on how to perform a restore operation.

#10: Perform an in-place upgrade

If you can't repair a Windows XP system that won't boot and you don't have a recent backup, you can perform an in-place upgrade. Doing so reinstalls the operating system into the same folder, just as if you were upgrading from one version of Windows to another. An in-place upgrade will usually solve most, if not all, Windows boot problems.

Performing a Windows XP in-place upgrade is pretty straightforward. To begin, insert the Windows XP CD into the drive, restart your system, and boot from the CD. Once the initial preparation is complete, you'll see the Windows XP Setup screen (shown earlier in Figure A). Press [Enter] to launch the Windows XP Setup procedure. In a moment, you'll see the License Agreement page and will need to press [F8] to acknowledge that you agree. Setup will then search the hard disk looking for a previous installation of Windows XP. When it finds the previous installation, you'll see a second Windows XP Setup screen, as shown in Figure C.

Figure C
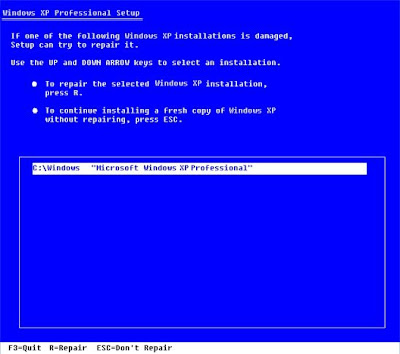

This screen will prompt you to press R to repair the selected installation or to press [Esc] to install a fresh copy of Windows XP. In this case, initiating a repair operation is synonymous with performing an in-place upgrade, so you'll need to press R. When you do so, Setup will examine the disk drives in the system. It will then begin performing the in-place upgrade.

Keep in mind that after you perform an in-place upgrade or repair installation, you must reinstall all updates to Windows.


Hide a Whole Partition of HDD

1. Go to Start > run > type "diskpart".
A DOS window will appear with following discription.
DISKPART>

2. Then type "list volume"

The result will look like : ------


Volume ### Ltr Label Fs Type Size Status Info
--------------- --- -------- ---- ------ ---- ------ ----

Volume 0 F CD-ROM
Volume 1 C Window_XP NTFS Partition 7000MB Healthy System
Volume 2 D Softwares NTFS Partition 8000MB Healthy
Volume 3 E Songs NTFS Partition 8000MB Healthy


3. Suppose u wanna hide drive E then type "select volume 3"

Then a message will appear in same winwods { Volume 3 is the selected volume}

4. Now type "remove letter E"
Now a message will come { Diskpart Removed the Drive letter }
sometime it requires the reboot the computer .

Diskpart will remove the letter .Windows XP is not having capabilty to identify the unkown volume.

Your Data is safe now from all unauthorised users.
To access the content of hidden Drive repeat the process mentioned above. But in 4th step replace " remove" to "assign"
i mean type "assign letter E"

Saturday, September 15, 2007

Access Database Manipulation via JDBC (for Microsoft Access)

Hello guys, the assignment on distributed system in java require the use of database manipulation,
well I have found this small and easy tutorial on database in java and I hope this will help you.

Disclaimer:
This tutorial is not mine, if the author(Jeff Paterson) objects that his tutorial is published on my blog, he may contact me to have it removed.The following has worked for me...use it at your own risk(If your computer starts misbehaving with you...am not to be blamed...lol)


This will teach you how to connect to a Microsoft Access database. Once you are connected, you may run any SQL statement that is allowable on Access, such as:
a SELECT statement to retrieve data
an INSERT statement to add data
a DELETE statement to remove data
an CREATE TABLE statement to build a new table
a DROP TABLE statement to destroy a table
This document goes at a pretty slow pace, so you may not need to cover every little detail here. If you are entirely new to JDBC, you shouldn't have too much trouble following along. So let's get going!

Steps to take:

There are three things we need to do to manipulate a MS Access database:
1) Set up Java to undestand ODBC,
2) Get a connection to our MS Access Database,
3) Run a SQL statement.


1) First we need to set up Java to understand how to communicate with an ODBC data source
  • Set up your DriverManager to understand ODBC data sources
2) After we set up the DriverManager, we need to get a Connection
There are two ways to get a connection from your Microsoft Access Database:

  1. Get a connection by accessing the Database Directly. The simpler way, but may not work on all systems! 
  2. Set the Access Database up as an ODBC DSN and get a connection through that. A little more complex, but will work on any system, and will work even if you don't already have a Microsoft Access Database!

3) Once you have gained access to the Database (been granted a connection), you are ready to try:
  • Running a SQL Statement on your Access Database. This is the section that you will be most interested in - if you're impatient, you might want to start here...but please come back and read it all!

Step 1) Set up your DriverManager to understand ODBC data sources

The first thing we must do in order to manipulate data in the database is to be granted a connection to the database. This connection, referenced in the Java language as an Object of type java.sql.Connection, is handed out by the DriverManager. We tell the DriverManager what type of driver to use to handle the connections to databases, and from there, ask it to give us a connection to a particular database of that type.

For this tutorial, we are interested in accessing a Microsoft Access database. Microsoft has developed a data access method called ODBC, and MS Access databases understand this method. We cannot make a connection directly to an ODBC data source from Java, but Sun has provided a bridge from JDBC to ODBC. This bridge gives the DriverManager the understanding of how to communicate with an ODBC (ie a MS Access) data source.

So the first thing we'll do is set up our DriverManager and let it know that we want to communicate with ODBC data sources via the JDBC:ODBC bridge. We do this by calling the static forName() method of the Class class. Here is an entire program that accomplishes what we're after:

class Test


{
public static void main(String[] args)


{


try {
Class.forName("sun.jdbc.odbc.JdbcOdbcDriver");
}


catch (Exception e) {
System.out.println("Error: " + e);
}

}

}
//save this code into a file called Test.java and compile it

Notice the TRY-CATCH block. The forName() method might throw a ClassNotFoundException. This really can't happen with the JDBC:ODBC bridge, since it's built in to the Java API, but we still have to catch it. If you compile and run this code, it's pretty boring. In fact, if it produces any output, then that means that you've encountered an error! But it shows how to get your DriverManager set.

We're now ready to try and get a connection to our specific database so we can start to run SQL statements on it!

Step 2 method 1) Get a connection by direct access

One way to get a connection is to go directly after the MS Access database file. This can be a quick and easy way to do things, but I have seen this not work on some windows machines. Don't ask me why - I just know that it works sometimes and it doesn't others...

Here is a complete sample program getting a connection to a MS Access database on my hard drive at D:\java\mdbTEST.mdb. This sample includes the lines required to set the DriverManager up for ODBC data sources:

import java.sql.*;
class Test


{
public static void main(String[] args)


{


try {
Class.forName("sun.jdbc.odbc.JdbcOdbcDriver");
// set this to a MS Access DB you have on your machine
String filename = "d:/java/mdbTEST.mdb";
String database = "jdbc:odbc:Driver={Microsoft Access Driver (*.mdb)};DBQ=";
database+= filename.trim() + ";DriverID=22;READONLY=true}"; // add on to the end
// now we can get the connection from the DriverManager
Connection con = DriverManager.getConnection( database ,"","");
}


catch (Exception e) {
System.out.println("Error: " + e);
}

}

}
//save this code into a file called Test.java and compile it

Notice that this time I imported the java.sql package - this gives us usage of the java.sql.Connection object.

The line that we are interested in here is the line
Connection con = DriverManager.getConnection( database ,"","");
What we are trying to do is get a Connection object (named con) to be built for us by the DriverManager. The variable database is the URL to the ODBC data source, and the two sets of empty quotes ("","") indicate that we are not using a username or password.

In order to have this program run successfully, you have to have an MS Access database located at filename location. Edit this line of code and set it to a valid MS Access database on your machine. If you do not already have an MS Access database, please jump down to Set the Access Database up as an ODBC DSN section, which shows how to create an empty MS Access database.

If you do have a MS Access database, and this is working correctly, then you're ready to Run an SQL Statement!


Step 2 method 2) Set up a DSN and get a connection through that

Microsoft has provided a method to build a quick Jet-Engine database on your computer without the need for any specific database software (it comes standard with Windows). Using this method, we can even create a blank Microsoft Access database without having MS Access installed!

As we learned earlier, MS Access data bases can be connected to via ODBC. Instead of accessing the database directly, we can access it via a Data Source Name (DSN). Here's how to set up a DSN on your system:

  1. Open Windows' ODBC Data Source Administrator as follows:  
    • In Windows 95, 98, or NT, choose Start > Settings > Control Panel, then double-click the ODBC Data Sources icon. Depending on your system, the icon could also be called ODBC or 32bit ODBC.
    • In Windows 2000, choose Start > Settings > Control Panel > Administrative Tools > Data Sources.
  2. In the ODBC Data Source Administrator dialog box, click the System DSN tab.
  3. Click Add to add a new DSN to the list.
  4. Scroll down and select the Microsoft Access (.MDB) driver
  5. Type in the name "mdbTEST" (no quotes, but leave the cases the same) for the Data Source Name
  6. Click CREATE and select a file to save the database to (I chose "d:\java\mdbTEST.mdb") - this creates a new blank MS Access database!
  7. Click "ok" all the way out

Now our data source is done! Here's a complete program showing how to access your new DSN data source:

import java.sql.*;
public class Test


{
public static void main(String[] args)


{
// change this to whatever your DSN is
String dataSourceName = "mdbTEST";
String dbURL = "jdbc:odbc:" + dataSourceName;
try {
Class.forName("sun.jdbc.odbc.JdbcOdbcDriver");
Connection con = DriverManager.getConnection(dbURL, "","");
}


catch (Exception err) {
System.out.println( "Error: " + err );
}

}

}
//save this code into a file called Test.java and compile it
As stated in the code, modify the variable dataSourceName to whatever you named your DSN in step 5 from above.

If this complies and runs successfully, it should produce no output. If you get an error, something isn't set up right - give it another shot!

Once this is working correctly, then you're ready to Run an SQL Statement!

Step 3) Running a SQL Statement on your Access Database

Once you have your connection, you can manipulate data within the database. In order to run a SQL query, you need to do 2 things:

  1. Create a Statement from the connection you have made
  2. Get a ResultSet by executing a query (your insert/delete/etc. statement) on that statement
Now lets learn how to make a statement, execute a query and display a the ResultSet from that query.

Refer to the following complete program for an understanding of these concepts (details follow):

This code assumes that you have used the DSN method (Step 2 method 2) to create a DSN named mdbTest. If you have not, you'll need to modify this code to work for a direct connection as explained in Step 2 method 1.

import java.sql.*;
public class Test


{
public static void main(String[] args)


{


try {
Class.forName("sun.jdbc.odbc.JdbcOdbcDriver");
/* the next 3 lines are Step 2 method 2 from above - you could use the direct
access method (Step 2 method 1) istead if you wanted */
String dataSourceName = "mdbTEST";
String dbURL = "jdbc:odbc:" + dataSourceName;
Connection con = DriverManager.getConnection(dbURL, "","");
// try and create a java.sql.Statement so we can run queries
Statement s = con.createStatement();
s.execute("create table TEST12345 ( column_name integer )"); // create a table
s.execute("insert into TEST12345 values(1)"); // insert some data into the table
s.execute("select column_name from TEST12345"); // select the data from the table
ResultSet rs = s.getResultSet(); // get any ResultSet that came from our query
if (rs != null) // if rs == null, then there is no ResultSet to view
while ( rs.next() ) // this will step through our data row-by-row


{
/* the next line will get the first column in our current row's ResultSet
as a String ( getString( columnNumber) ) and output it to the screen */
System.out.println("Data from column_name: " + rs.getString(1) );
}

s.execute("drop table TEST12345");
s.close(); // close the Statement to let the database know we're done with it
con.close(); // close the Connection to let the database know we're done with it
}


catch (Exception err) {
System.out.println("ERROR: " + err);
}

}

}
//save this code into a file called Test.java and compile it

If this program compiles and runs successfully, you should see some pretty boring output:

Data from column_name: 1


While that may not seem like much, let's take a quick look at what we've accomplished in the code.


  1. First, we set the DriverManager to understand ODBC data sources.

    Class.forName("sun.jdbc.odbc.JdbcOdbcDriver");

  2. Then, we got a connection via the DSN as per Step 2 Method 2:

    String dataSourceName = "mdbTEST";
    String dbURL = "jdbc:odbc:" + dataSourceName;
    Connection con =DriverManager.getConnection(dbURL,"","");

    We could have used the direct method instead to get our connection.

  3. Next, we created a java.sql.Statement Object so we could run some queries:

    Statement s = con.createStatement();

  4. Then came the exciting stuff - we ran some queries and made some changes!

    s.execute("create table TEST12345 ( column_name integer )");
    // create a table
    s.execute("insert into TEST12345 values(1)");
    // insert some data into the table
    s.execute("select column_name from TEST12345");
    // select the data from the table

  5. The next part might be a little strange - when we ran our select query (see above), it produced a java.sql.ResultSet. A ResultSet is a Java object that contains the resulting data from the query that was run - in this case, all the data from the column column_name in the table TEST12345.

    ResultSet rs = s.getResultSet();
    // get any ResultSet that came from our query
    if (rs != null)
    // if rs == null, then there is no ResultSet to view
    while ( rs.next() )
    // this will step through our data row-by-row


    {
    /* the next line will get the first column in our current
    row's ResultSet
    as a String ( getString( columnNumber) ) and output it to
    the screen */
    System.out.println("Data from column_name: "+rs.getString(1) );
    }


  6. As you can see, if the ResultSet object rs equals null, then we just skip by the entire while loop. But since we should have some data in there, we do this while ( rs.next() ) bit.


    What that means is: while there is still data to be had in this result set, loop through this block of code and do something with the current row in the result set, then move on to the next row.


    What we're doing is looping through the result set, and for every row grabbing the first column of data and printing it to the screen. We are using the method provided in the result set called getString(int columnNumber) to get the data from the first column in our result set as as String object, and then we're just printing it out via System.out.println.


    We know that the data in our ResultSet is of type String, since we just built the table a couple of lines before. There are other getXXX methods provided by ResultSet, like getInt() and getFloat(), depending on what type of data you are trying to get out of the ResultSet. Please refer to the JSDK API for a full description of the ResultSet methods.


  7. After that we just cleaned up our database by dropping (completely removing) the newly created table:

    s.execute("drop table TEST12345");

  8. Lastly, we need to close the Statement and Connection objects. This tells the database that we are done using them and that the database can free those resources up for someone else to use. It is very important to close your connections - failure to do so can over time crash your database! While this isn't too important with a MS Access database, the same rules apply for any data base (like Oracle, MS SQL, etc.)

    s.close(); // close the Statement to let the database know we're done with it
    con.close(); // close the Connection to let the database know we're done with it


That's it!! Now you know the basics for connecting to a MS Access Database via JDBC!

I hope this will be useful to you...leave a comment if you like it

Sports week....already over!!!

This past week was UOM sports week for the academic year 2007-2008 (too bad :(  ...there won't be another one next semester ).Anyway..how was the week for me:

On Tuesday, I was eliminated in the UOM programming contest(2nd round...won't comment about that, maybe later will post my answers when i'm free)

On Wednesday,..ahh wednesday....was too coooool coz my  friends and i had a lot of fun, we went on an outing...games we played at the seaside ti trop top.Well we had gone to Rochester fall and then at Le Mornes...bref seki pane vini ine rate mari boucou..

On Thursday (well If I could, i would remove thursday from this week as if it never happened), hmmm we had a rather early exit in the football tournament this time (last time vice-champion).
However, later on that day, ti alle guette Hey baby dan auditaurium...was very nice..ti bien riyer.

On Friday, we had a birthday party...ein actually several birthday parties of all those who had their birthday during the holidays(including me)

Well well...the week is over and so is sports week
Now next week...got three assignment(labs) to submit
One for distributed system(about 40-50% complete)
one for Operation research(simulation in Opengl)
and a small one in concurrency using jbaci

On top of that got to work on my final year project..has to come up with a draft this week

All that to be done this weeken..fouf